Use a custom image size in your testimonials
Jul 25 2013 0 Comments

In this post I will show you how to create a user defined image size in your functions.php file and then we will go over how to use that image size in your output template for the TB-Testimonials WordPress plugin.
Defining a new image is size easy peasy, it’s only a single line and uses add_image_size() to register a new size. Here’s our code for a 200×250 size thumbnail image.
Now we need to register a new template tag with TB-Testimonials that uses the new image size we created. We would do that by using the tbt_template_functions hook like so.
After we create the hook we need to create the callback function that is referenced in the hook tbt_register_tags. Note: Callbacks passed to the tbt_template_functions hook are passed a twig instance as an argument.
Alright so now we have our callback for the template tag all ready for us but we need to create another callback for this function that gets our content. In this example we named it get_my_thumbnail_image and it look like this
And that’s all there is to it. Basically what we have done is added a new template tag to TB-Testimonials that outputs an image our or desired size. Here’s our final functions.php file incase you missed anything or would like to see the whole thing all together.
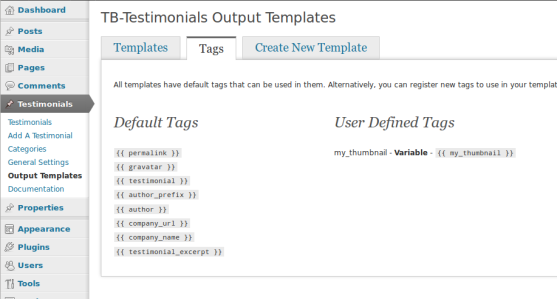
After you have added your new template tag you will notice that the tag has been added to the ‘tags’ tab of the output settings page like seen here
And then you can use it an existing output template or create your own that uses the tag like so
Notice:
In my example output content I wrapped the my_thumbnail tag in a testimonial-gravatar CSS class. This class by default has a set width of 50px on it.
Still Not Working?
You will need to rebuild any thumbnails that were created before you added your new image sizes.


